|
Juggler's Workshop Cigar
Boxes by
Jeff Daymont (Editor's
note: This
issue's workshop is by special guest author Jeff
Daymont, well known wizard of cigar box manipulation.)
In
this article I will give a quick rundown on getting started with
cigar boxes, provide an explanation of the more advanced tricks
called Elevators, and show how you can develop tricks on your own
using mathematical permutations no matter what your level.
Abbreviations that I often use in the descriptions are "L" and "R" for left and right hands, "1 ", "2" and "3" for the boxes in the diagram, and "CW" and "CCW" for clockwise and counterclockwise. In Fig. 3, showing the Take Out (which I'll explain in detail later), the arrow with the dotted line represents the motion of your empty hand, and the arrow with the solid line shows the motion of the box. I use a solid arrow to show where a box is going or where it is coming from. The box can be either falling freely or carried by hand.
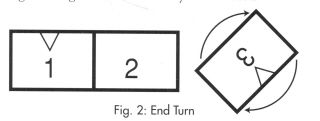
First here is an explanation of the diagrams that I use. Fig. 1 shows the Home position from the juggler's point of view. The V's represent your hands and the numbers will always start upright and in order, but tricks ending at Home won't necessarily end with both hands on top or the numbers in order. Fig. 2 shows the most basic trick, the End Turn. Arrows show the direction of the box's rotation. Since the trick ends in Home position, the last diagram showing the boxes together again would usually be omitted.
There
are three axes on which the boxes rotate (Fig. 4). The most common I
call the X axis, where the face of the box stays towards
Getting
Started The
written word can never take the place of a live instructor, but I'll
do my best to explain the basic movement for most tricks. And for
you more advanced boxers, I will sprinkle some important tips on
technique and descriptions of more advanced tricks throughout, so
don't just skip to the end!
The
illusion that cigar boxes seem to float is produced in much the same
way that astronauts simulate weightlessness without leaving the
earth's atmosphere. Astronauts get into an airplane, soar to a high
altitude, then drop in a freefall where the plane and everything
inside falls at the same rate, making them weightless in relation to
each other. In the same way you will use your legs to lift up your
body and boxes together, then as the boxes fall your body falls with
them to give the illusion that the boxes are floating as you change
their positions. The
End Turn The
first trick to try is the End Turn (Fig. 2). Start with the boxes
together and your knees bent slightly, then straighten your legs as
if you are doing a small jump but without leaving the ground. As you
reach the top, separate one of the end boxes from the others, turn
it upside down and bring them back together again with your hand
underneath. As you are trapping the middle box in the center you
will let your knees bend so that your body falls at the same rate as
the box that you are not holding. It is important to keep your back
straight and to use your leg muscles to avoid back strain.
For
all of the End Turns, your hand will
As
you get comfortable with the End Turn in both directions (upside
down and back rights side up again) and with either hand, you can
try both hands together. The basic Two Handed End Turn starts at
Home position with both hands on top, then with the same lifting
motion turn both end boxes upside down (box 1 turns CCW, 3 turns CW)
and trap the middle box with both hands underneath. Other Two Handed
End Turns start with both hands on the bottom and turning to end on
top, or with one hand up and the other down and turning to end in
opposite orientations.
The
Middle Flip The
Middle Flip is simply flipping the middle box at Home position 180
degrees in either direction on any of the three axes (X, Y or Z). For
the X axis Middle Flip, you'll hold on to both end boxes as you pull
up slightly with one hand and pull down with the other to start box 2
rotating and separate boxes 1 and 3. Then when 2 has turned, pin it at
Home position again.
The
Y axis Middle Flip is all in the wristsquickly turn all three boxes
from Home position so that the bottom edge faces away from you and
release 2 so that it continues to turn in that direction. Bring the
end boxes back up to their starting positions and pin 2 at Home when
its front side turns to face you.
To
start 2 turning on the Z-axis, you'll pull forward with one hand as
you pull back with the other. I like to bow my head down directly over
the center box for the best view of its rotation in this axis.
You
can turn all three boxes at once by combining End Turns with X axis
Middle Flips. The most visual of
these tricks are to turn all three boxes in the same direction or to
turn the end boxes in one direction as the middle box turns the
opposite direction. Notice that for both of these tricks, both of the
boxes that are in your hands will turn in the same direction (CW or
CCW) and that, to keep both hands on the outside as the boxes turn,
you need to start with one hand above and the other in the underneath
position. The
Take Out Next
is the Take Out (Fig. 3). This time as you go up, you release box 3
with your right hand to grab box 2 and carry it to the right
An
important element of the lifting motion is to use your legs but not
your arms. When you lift with your arms, you will pivot the boxes from
the shoulder and the front of the boxes will start to turn up to the
ceiling.
A
variation on the Take Out is to take the center box and pull it over
the top. Once the center box has been pulled up, you'll need faster
hands to pull it back down in time to pin the one that's falling. You
can also start the take outs with your hands underneath the boxes and
pull the center box up over the top or down underneath. |